初心者向けにGitの基本、よく使うコマンドについて解説していきます。
Gitの概要、使うことのメリットについては、前回の記事を参照ください。
Contents
Gitの概要、構成
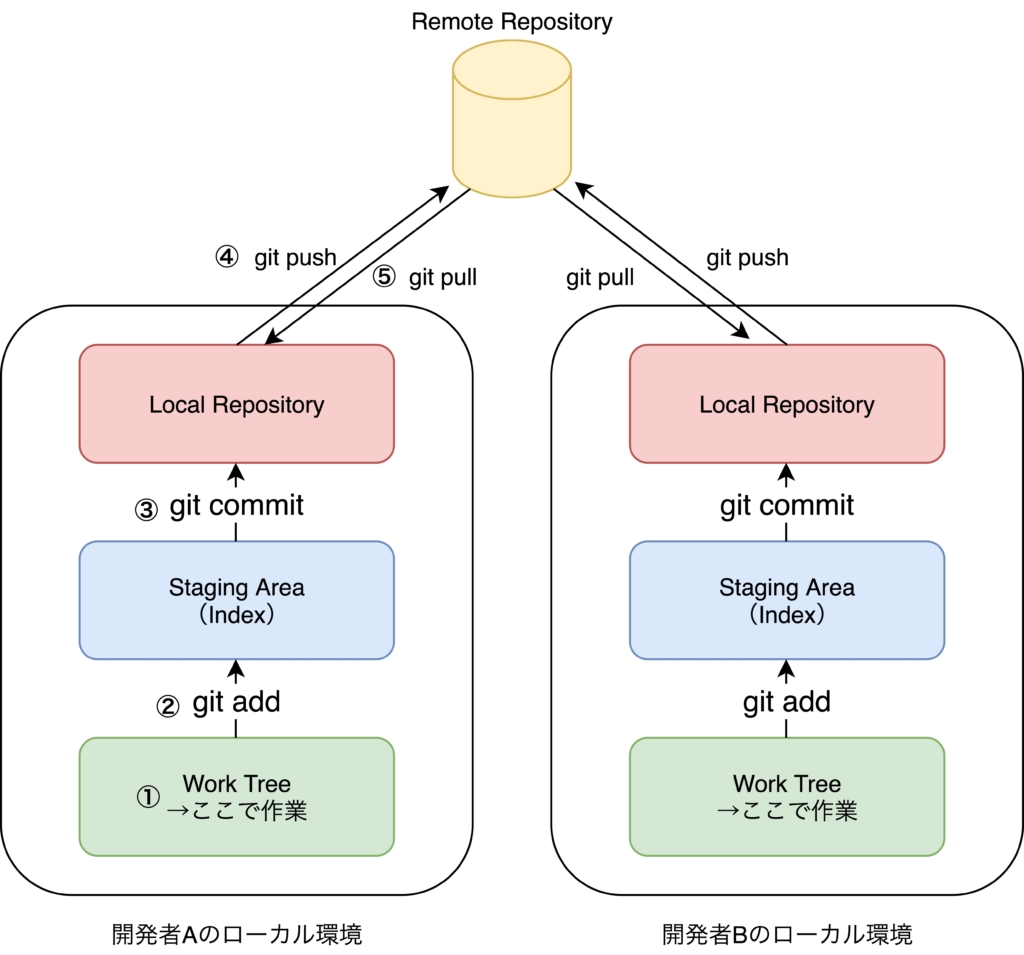
Gitの概念図と概要、構成は以下のような感じです。
分散型バージョン管理システムのため、開発者Aと開発者Bそれぞれ個別に開発を進めることができます。
さらに、Remote Repositoryで統合管理を行うことで整合性を担保しています。

Work Tree
各開発者の作業場所です。
新規作成/編集したファイルはまずここに保存されます。
Staging Area(Index)
commitしたいファイルを一時的に置いておく場所です。
git addコマンドで、Work Treeで新規作成/編集したファイルをStaging Areaにアップできます。
Local Repository
ローカル開発環境のファイル共有場所です。
Git commitコマンドで、Staging AreaにあるファイルをLocal Repositoryにcommitできます。
Remote Repository
開発者全員のファイル共有場所です。
Git pushコマンドで、各開発者のLocal Repositoryのファイルを共有できます。
また、git pullコマンドでRemote Repositoryの共有ファイルを各自のLocal Repositoryに反映することができます。
よく使うGitコマンド
git init
gitプロジェクトを新規作成します。
作成したいディレクトリに移動してからgit initコマンドを叩いてください。
$ git init
Initialized empty Git repository in <ディレクトリ名>/.git/
git clone
指定したリポジトリ名のプロジェクトを、指定したディレクトリにコピーします。
$ git clone <リポジトリ名> <ディレクトリ名>
Cloning into '<ディレクトリ名>'...
remote: Enumerating objects: 190, done.
remote: Counting objects: 100% (190/190), done.
remote: Compressing objects: 100% (128/128), done.
remote: Total 190 (delta 53), reused 172 (delta 38), pack-reused 0
Receiving objects: 100% (190/190), 70.62 KiB | 420.00 KiB/s, done.
Resolving deltas: 100% (53/53), done.
git status
ワーキングツリー、ステージングエリアの状況を確認します。
変更したファイルや新規追加したファイルがステージングエリアにある場合は以下のように表示されます。
$ git status

On branch <ブランチ名>
Changes not staged for commit:
(use "git add ..." to update what will be committed)
(use "git restore ..." to discard changes in working directory)
modified: <変更したファイル名>

Untracked files:
(use "git add ..." to include in what will be committed)
<新規作成したファイル名>
ステージングエリアに追加したファイルがある場合は、以下のように表示されます。
..." to unstage)
modified: <ステージングエリアに追加したファイル名>
git add
ワーキングツリーで編集したファイルをステージングエリアにアップします。
ファイル名を指定して追加する場合
$ git add <ファイル名>ステージングエリアの全てのファイルを追加する場合(.は全てのファイルを意味します)
$ git add .編集したファイルの一部を追加する場合
$ git add -p-pオプションをつけて実行すると、以下が表示されます。
表示された箇所を追加する場合は「y」、追加しない場合は「n」、さらに細かく指定する場合は「s」を入力します。
(1/1) Stage this hunk [y,n,q,a,d,s,e,?]?-pオプションは、便利なので覚えておくと何かと役に立ちます。
git commit
ステージングエリアに上がっているファイルをローカルリポジトリにコミットします。
-mオプションで、コミットメッセージを追加できます。
$ git commit -m "<コミットメッセージ>"

[master aa1db46] <コミットメッセージ>
8 files changed, 67 insertions(+), 21 deletions(-)
create mode 100644 <コミットしたファイル名>
git commit --amend
コミットメッセージを修正したい場合は、git commit --amendコマンドが使えます。
開いたvimエディタで直接コミットメッセージを編集できます。
なお、git commit --amendで修正して良いのは、git pushする前のコミットのみです。
git push後だとコンフリクトが発生するので、注意してください。
$ git commit --amend

↓↓ vimエディタが開き、コミットメッセージを編集できる

<コミットメッセージ>

# Please enter the commit message for your changes. Lines starting
# with '#' will be ignored, and an empty message aborts the commit.
#
# Date: Sat Sep 26 14:59:19 2020 +0900
#
# On branch master
# Changes to be committed:
# modified: <コミットしたファイル名>
git push
ローカルリポジトリにコミットしたファイルをリモートリポジトリにプッシュします。
git pushコマンドを実行する前に、git remote addコマンドでリモートリポジトリを登録しておいてください。
$ git push <リモートリポジトリ名> <リモートブランチ名>

Enumerating objects: 34, done.
Counting objects: 100% (34/34), done.
Delta compression using up to 8 threads
Compressing objects: 100% (17/17), done.
Writing objects: 100% (18/18), 2.56 KiB | 2.56 MiB/s, done.
Total 18 (delta 10), reused 0 (delta 0)
remote: Resolving deltas: 100% (10/10), completed with 9 local objects.
To <リポジトリ名>